Looking for a reliable MP4 to Apple ProRes converter to bring your MP4 files into professional editing software like Final Cut Pro, DaVinci Resolve, or Adobe Premiere Pro? In this guide, you’ll learn how to convert MP4 to ProRes 422 for visually lossless, high‑performance editing with an ideal balance of quality and file size, as well as how to convert MP4 to ProRes 4444 when you need the highest color fidelity (4:4:4) and alpha channel support for advanced visual effects and color grading. We’ll walk you through why MP4 files struggle in post‑production, introduce a powerful solution called Acrok Video Converter Ultimate, and provide a simple step‑by‑step conversion process for both Mac and Windows users.
What is MP4?
MP4 (MPEG‑4 Part 14) is a digital multimedia container format that most commonly stores video and audio streams compressed with H.264 or H.265 (HEVC). It has become the universal standard for online streaming, social media, and portable devices. Most modern cameras, smartphones (iPhone, Android), action cams (GoPro, DJI), drones, and screen recorders output MP4 by default. While MP4 is highly efficient for storage and sharing, it is not optimized for editing.
What is Apple ProRes?
Apple ProRes is a family of “visually lossless” video codecs developed by Apple specifically for professional post‑production. Unlike delivery formats like H.264, which store only a few complete frames and “guess” the rest (inter‑frame compression), ProRes uses intra‑frame compression, storing every single frame independently. This makes files larger but allows your computer to play and scrub through them smoothly, because it doesn’t have to reconstruct frames from neighboring data.
The ProRes family includes several variants tailored to different use cases:
- ProRes 422 (and 422 HQ): Uses 10‑bit color depth with 4:2:2 chroma subsampling. This variant strikes an excellent balance between image quality and file size, making it the go‑to choice for most editing and color grading workflows.
- ProRes 4444: Supports up to 12‑bit 4:4:4:4 color depth, including an optional alpha channel (transparency). This variant preserves all color information and is ideal for high‑end visual effects, keying, and professional color grading where maximum fidelity is required.
ProRes provides smooth editing, high color fidelity, resilience in multi‑generational workflows, and wide industry support across virtually all major editing programs.
Why Convert MP4 to ProRes?
Many editors wonder: If MP4 is so widely used, why can’t I just edit it directly? The answer lies in the fundamental differences between how these two codecs work. Here are the key reasons to convert MP4 to ProRes:
1. Smoother Editing Performance
MP4 files typically contain H.264 or H.265 video, which use inter‑frame (long‑GOP) compression. This means only a few frames (I‑frames) are stored as complete images, while the frames in between (P and B frames) only record the differences. To display any given frame, your editing software must decode multiple surrounding frames, putting a heavy load on your CPU.
ProRes, by contrast, uses intra‑frame compression—every frame is a complete, independently encoded image. Your NLE (non‑linear editor) can instantly decode any frame without processing neighboring frames, resulting in significantly smoother playback, faster scrubbing, and more responsive editing overall.
2. Superior Color Grading and Visual Effects
ProRes variants use 10‑bit or 12‑bit color depth with 4:2:2 or 4:4:4 chroma subsampling, while typical MP4 files are limited to 8‑bit color and 4:2:0 chroma sampling. This difference becomes critical when you apply heavy color grading, adjust exposure, or pull keys. With 8‑bit footage, you’ll often see color banding, posterization, or compression artifacts. ProRes preserves far more tonal and color information, allowing you to push grades further without visible degradation.
3. Reduced Rendering Errors and Crashes
Long‑GOP frames can cause glitches during timeline rendering, especially when working with multiple layers, effects, or transitions. ProRes eliminates this by providing clean, independent frames that editing software can process reliably. Converting to ProRes dramatically reduces the risk of export errors or timeline corruption.
4. Cross‑Platform and Multi‑Software Compatibility
ProRes is now widely supported not only on macOS but also on Windows (via certain codecs) and Linux, making it a safe intermediate format when collaborating across different systems. Whether you’re moving between Final Cut Pro, Premiere Pro, DaVinci Resolve, or Avid Media Composer, ProRes files work seamlessly everywhere.
5. Multi‑Generational Workflow Resilience
When you need to export, re‑import, and further process footage—common in complex post‑production pipelines—ProRes withstands multiple encode/decode cycles with minimal quality loss. MP4 degrades noticeably after just one or two re‑encodes. ProRes acts as a reliable “master” or “mezzanine” format that preserves quality through repeated processing.
Recommended Tool: Acrok Video Converter Ultimate
To convert MP4 to ProRes 422 or ProRes 4444 on either Mac or Windows, we highly recommend Acrok Video Converter Ultimate. This all‑in‑one video conversion software is designed to handle everything from basic format changes to professional‑grade transcoding.
Key Features
- Broad Format Support: Loads 8K/6K/4K/Full HD videos including MP4, MKV, AVI, WMV, MOV, MTS, MXF, and can convert them to virtually any format. It also handles Blu‑ray and DVD conversion.
- Professional ProRes Encoding: Directly outputs ProRes MOV files with support for ProRes 422, ProRes 4444, and other ProRes variants. This makes it an excellent MP4 to Apple ProRes converter for professional workflows.
- Hardware Acceleration: Supports NVIDIA and AMD technologies to dramatically speed up conversion times without compromising quality.
- Built‑in Video Editing: Before converting, you can trim, crop, merge clips, add watermarks, adjust effects, and modify audio/subtitle tracks—all within the same interface.
- Batch Conversion: Process multiple MP4 files at once, saving significant time when working with large amounts of footage.
- Intuitive Interface: Clean, user‑friendly design that makes professional‑grade conversion accessible to users of all skill levels.
Pricing Note
Acrok Video Converter Ultimate is a paid application. Its lifetime license is approximately $55.30. While not free, it offers a complete, stable, and feature‑rich solution for creators who regularly work with video conversion. For those on a tight budget, free alternatives like Shutter Encoder (based on FFmpeg) or HandBrake 1.11 (which recently added ProRes encoding support) can also convert MP4 to ProRes, though they may have steeper learning curves or fewer built‑in features.
Step‑by‑Step Conversion Guide
Follow these simple steps to convert your MP4 files to Apple ProRes 422 or ProRes 4444 using Acrok Video Converter Ultimate.
Step 1: Download and Install
Visit the official Acrok website, download the version for your operating system (Windows or macOS), and install the software. Launch Acrok Video Converter Ultimate after installation.
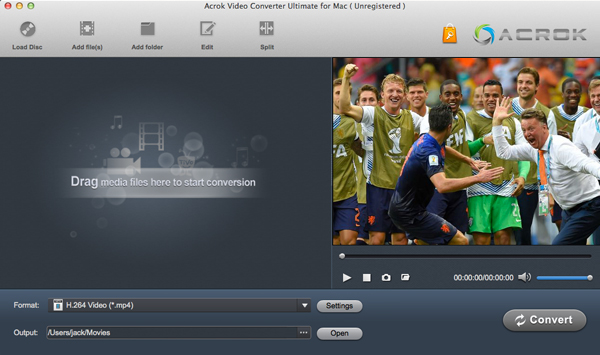
Step 2: Import MP4 Files
Click the “Add Files” button on the main interface to load your MP4 files from your computer or external devices. Alternatively, you can simply drag and drop files directly into the software window. Acrok supports batch conversion, so you can add multiple files at once.
Step 3: Select ProRes as the Output Format
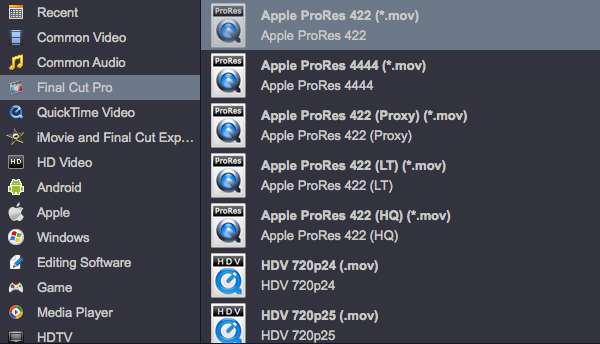
Click the “Format” drop‑down menu and navigate to the ProRes MOV options. Choose the appropriate variant based on your needs:
- Select ProRes 422 (or ProRes 422 HQ) for most editing and color grading workflows. This provides excellent quality with manageable file sizes.
- Select ProRes 4444 when you need maximum color fidelity, 4:4:4 chroma subsampling, or alpha channel support for visual effects and high‑end grading.
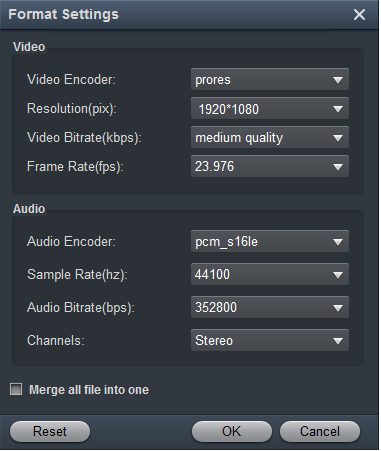
Step 4: Adjust Output Settings (Optional)
If you need fine control over the output, click the “Settings” button to access advanced parameters. Here you can adjust video resolution, frame rate, bitrate, audio settings, and more to match your project specifications.
Step 5: Start Conversion
Choose an output folder for your converted files using the “Output” menu. When you’re ready, click the “Convert” button to begin the conversion. Thanks to hardware acceleration, the process is fast even for high‑resolution 4K or 8K files. Once completed, click “Open” to access your ProRes‑encoded MOV files.
Step 6: Import into Your NLE
Your newly converted ProRes files are now ready to be dragged directly into Final Cut Pro, Premiere Pro, DaVinci Resolve, or any other professional editing software. You’ll immediately notice smoother playback, faster rendering, and a more responsive editing experience.
Free Alternatives to Consider
If you’re not ready to invest in paid software, here are two capable free options:
- Shutter Encoder: A professional‑grade transcoding tool based on FFmpeg. It natively supports all ProRes variants and runs on Windows, macOS, and Linux. It’s completely free and offers advanced features like rewrapping (without re‑encoding) for quick container changes.
- HandBrake 1.11: As of its March 2026 release, HandBrake now includes ProRes and DNxHR encoders under the “Production ProRes” presets. It can output to MOV containers and is a great free option for users already familiar with HandBrake’s interface.
However, these free tools often require more manual configuration and lack the all‑in‑one editing and batch processing features that Acrok Video Converter Ultimate provides out of the box.
Conclusion
Converting MP4 to Apple ProRes 422 or ProRes 4444 is a game‑changer for anyone working in professional video post‑production. While MP4 is excellent for sharing and streaming, its long‑GOP compression makes it sluggish and unreliable for editing. ProRes, with its intra‑frame architecture, high color depth, and wide industry support, is the gold standard for intermediate codecs.
Acrok Video Converter Ultimate offers a simple, powerful, and reliable way to perform this conversion on both Mac and Windows. With its intuitive interface, batch processing, hardware acceleration, and built‑in editing tools, it’s an excellent choice for creators who need professional results without technical complexity.
Whether you choose Acrok or a free alternative, the key takeaway is this: convert your MP4 footage to ProRes before editing. Your timeline—and your sanity—will thank you.
Leave a Reply