Final Cut Pro Supported Video Format

Do you love to edit videos to product a fantastic personal production before posting them to Dailymotion, Vimeo, Twitch, YouTube, Metacafe and Flickr? Do you dream of becoming a film director to show your thought in a video? Then, everything can be started by Final Cut Pro. Edit recordings in Final Cut Pro and show what you want to show.
Convtents
Recently Apple released a new version of its video editor Final Cut Pro Pro – Version 10.6.1 . The new features in this version are: Improves stability when playing back H.264 video files with corrupt data, RED camera support and various other features and bug fixes. Final Cut Pro supports many video and audio formats, but there is a difference between the list of supported import formats. Final Cut Pro won't import MP4? Does Final Cut Pro support MOV files?
Final Cut Pro offers support for everything a professional video editor requires. You can import media from multiple devices (including 8K video), use more than 100 filters and special effects, and use specific tools to work with text layers and subtitles. The app also lets you easily optimize the image quality of your content with various tools. Now, let's see what video and audio files Final Cut Pro support and then you will know what files you can import to Final Cut Pro for editing.
Part 1: What's New in Final Cut Pro 10.6.1
- Improves stability when choosing the DPP/Editorial Services metadata view with MXF media.
- Improves stability when playing back H.264 video files with corrupt data.
- Fixes an issue in which text could disappear when double clicking a value field in the inspector.
- Fixes an issue that may prevent custom Motion titles stored inside the library from appearing in the Titles browser.
- Adds support for a new Universal RED plugin enabling native RED RAW decoding and playback on both Apple silicon and Intel-based Mac computers.
- Improves stability when using AirPlay with Final Cut Pro on a Mac computer with Apple silicon.
- Fixes an issue in which FCPXML files created from drop frame projects would import as non drop frame.
Minimum System Requirements for latest Final Cut Pro:
– macOS 10.15.6 or later
– 4GB of RAM (8GB recommended for 4K editing, 3D titles, and 360° video editing)
– 1GB of VRAM recommended for 4K editing, 3D titles, and 360° video editing;
Part 2: Final Cut Pro Supported Import Formats 10.6.1
Apple ProRes RAW and Apple ProRes RAW HQ
Apple Animation Codec
Apple Intermediate Codec
Apple ProRes (all versions)
Canon Cinema RAW Light (The plug-in software of the camera manufacturer is required)
AVCHD (Including AVCCAM, AVCHD Lite and NXCAM)
AVC-ULTRA (Including AVC-LongG, AVC-Intra Class 50/100/200/4:4:4 and AVC-Intra LT)
DV (Including DVCAM, DVCPRO and DVCPRO50)
DVCPRO HD
Uncompressed 10-bit 4:2:2
Uncompressed 8-bit 4:2:2
HDV
H.264
HEVC (macOS High Sierra 10.13)
iFrame
Motion JPEG (Only OpenDML)
MPEG IMX (D-10)
QuickTime Format
REDCODE RAW (R3D)(The plug-in software of the camera manufacturer is required)
XDCAM HD/EX/HD422
XAVC(Including XAVC-S)
XF-HEVC
XF-AVC
Native Editing Support for:
Apple ProRes
H.264 and HEVC from Apple Devices, GoPro, DSLR, and iFrame cameras/drones
Apple Intermediate Codec
Monoscopic and stereoscopic 360° video
MXF-wrapped media
DV, DVCAM, DVCPRO, DVCPRO 50, and DVCPRO HD
HDV
Panasonic AVC-Ultra
Sony IMX, XDCAM (EX, HD, HD422) XAVC, XAVC S, and XAVC-L
Canon XF MPEG-2
Canon XF-AVC
Canon Cinema RAW Light format
JVC-created XDCAM EX
JVC H.264 Long GOP
AVCHD
REDCODE RAW (.r3d)
Uncompressed 8- and 10-bit SD and HD
MTS files from AVCHD cameras
Still images including PSD, BMP, GIF, RAW, JPEG, PNG, TGA, and TIFF
Compressed audio including AAC, AIFF, CAF, MP3, MP4, and WAV
Broadcast Wave Format
SDII audio files
Portrait/landscape metadata in still images
Part 3: How to Import Unsupported Video Files into Final Cut Pro?
As shown above, Final Cut Pro Pro can't handle many video and audio file. How can you do when you want to import some Final Cut Pro unsupported files to edit? For example, you have some MP4, MOV files and want to edit MP4/MOV in Final Cut Pro. In this case, you can use some video converters to convert these unsupported video to Final Cut Pro supported video and audio formats.
A web seach for "Final Cut Pro Video Converter" or "Video Converter for Final Cut Pro", you will be recommended for many video converter applications. Among these software, Acrok Video Converter Ultimate for Mac is suggested strongly. It can convert any video and audio files to Final Cut Pro. It can convert Final Cut Pro unsupported MP4, MOV, MXF, MKV, AVI, TS, Tivo, OBS recordings, etc to Final Cut Pro and also can compress unsupported 8K/6K/4K video to best editing video resolution video for Final Cut Pro when you are runing a low-end computer that can't handle 8K/6K/4K video. Let you import and edit MXF in Final Cut Pro, edit MOV in Final Cut Pro, edit MP4 in Final Cut Pro without any problem. You can change video and audio encoder, resolution, bitrate, frame rate, sample rate to make the output video more compatible with Final Cut Pro 10.6, 10.5.2, 10.5.1, 10.5, 10.4.10, 10.4.9, 10.4.8, etc.
Download and get best video format converter for Final Cut Pro


In addition, Acrok Video Converter Ultimate for Mac is also an excellent video editing tool with some simple video editing function. You can trim video, crop video, merge video, split video. You also can add subtitle/watermark, rotate/flip video, edit audio.
Part 4: How to Convert Unsupported Formats for Final Cut Pro?
Step 1: Load videos into the software.
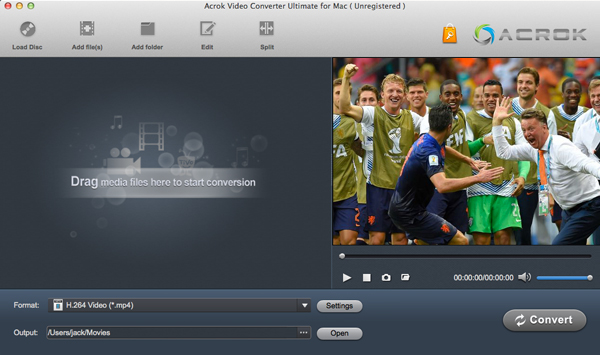
Start Acrok Video Converter Ultimate for Mac on your computer, Click "Add file (s)" or "Add folder" to load unsupported source video files into the best Final Cut Pro format converter. Or directly drag and drop the source file you want to the sftware. Then you can preview the whole videos in the preview window on the right.
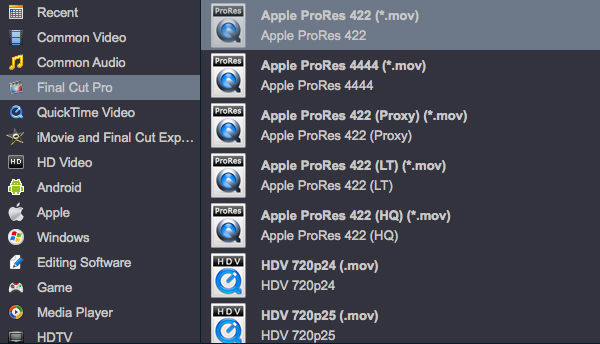
Step 2. Choose Final Cut Pro native editing format
Click "Format" option to choose the output format. Which format is the best video format for Final Cut Pro? Prores MOV is highly recommended. To make your Final Cut Pro to readthe output files, just choose the most Final Cut Pro accepted Apple ProRes 422 MOV or Apple ProRes 4444 MOV under "Final Cut Pro" option as output format.
Tips:
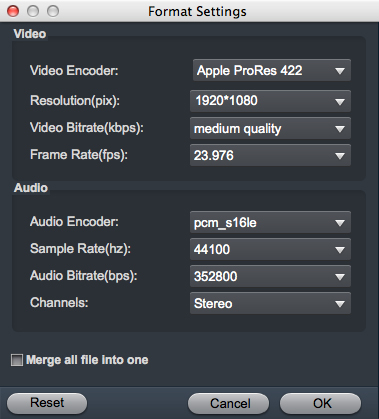
a. If the default settings do not fit your needs, you can click "Settings" button to customize output video parameters like bitrate, channels, frame rate, etc, such as to set higher bitrate to get much better image quality. In general, the higher video bit rate, the larger output file size, and vice versa.
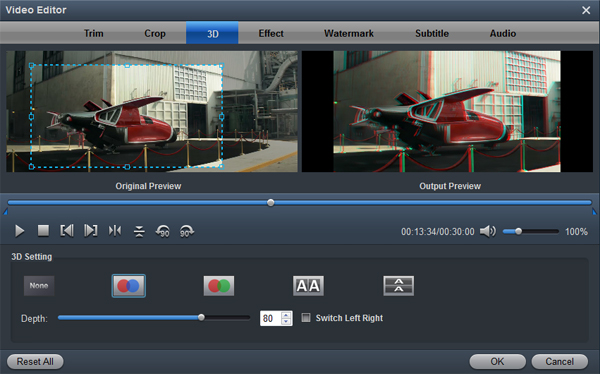
b. You can use the video editor designed in Acrok Video Converter Ultimate for Mac to edit your original videos. Click "Edit" on the main interface, and edit your videos by trimming (get/cut off video clips), cropping (remove unwanted areas), adding text/image/video watermarks, inserting subtitles, adding special effects, etc.
Step 3. Encode video to ProRes MOV
Hit the "Convert" button at the bottom right corner to start encoding unsupported video to Apple ProRes codec videos. Once finished, hit "Open" button to get the generated files.
Part 5: Two ways to Import Files into Final Cut Pro
Way 1: Dropping Footage Into Final Cut Pro
Alternatively, you can just drag and drop clips directly into your project from your desktop. It's just as easy as it sounds. Here's how it's done.
Step 1: Select Your Media. Select the media asset that you want to bring into Final Cut Pro. You can drag clips from the desktop or the Finder into Final Cut Pro.
Step 2: Drop it Into the Timeline. Simply drop the media file directly into your timeline in Final Cut Pro. Just be careful not to replace any existing clips in your timeline - unless of course that's your intention.
Way 2: Importing Footage Into Final Cut Pro
Step 1: Navigate to the Import Options. To import footage into Final Cut Pro you will need to navigate to the import menu options. To do so, simply navigate to File > Import > Media or hit Command+I on your keyboard.
Step 2: Find Your Clips. Use the media import menu to find your clips. The import menu works very similarly to finder. Just make sure to not double click on a file until you are ready to import it into Final Cut Pro.
Step 3: Once you select your clips, simply hit the Import button in the bottom right corner of the media import menu. You will now see your imported clips in your project panel.
Promotion

Best Mac ProRes Converter

Best Windows ProRes Converter

Awards


Hot Searchs
Awards
- CNET "Top Converter"
- PCWorld Reviewed "Powerful."
- CNET Editor's Pick
- Lifehacker "Best Editor"
- Full Antivirus Test-Clean