
Have you ever found yourself struggling to edit a high-quality HEVC/H.265 video in Final Cut Pro? You are not alone. HEVC/H.265 is widely praised for its excellent compression efficiency and high-definition video quality, but it is not natively friendly to many professional video editing workflows. In this article, I will explain why HEVC/H.265 and Final Cut Pro do not always get along, and then provide you with the best solution: converting HEVC/H.265 to Apple ProRes 422 or 4444 MOV format. You will learn step-by-step how to use a reliable converter for both Mac and Windows, and I will also share tips on output settings, performance optimization, and common pitfalls to avoid.
Why HEVC/H.265 Is Popular but Problematic for Editing
HEVC/H.265 has become the go‑to codec for 4K, 8K, and HDR content. Compared to its predecessor H.264, HEVC can reduce file sizes by up to 50% while maintaining the same visual quality. This makes it perfect for streaming services, digital downloads, and storing large movie libraries. Many people buy or download HEVC/H.265 movies to enjoy on Smart TVs, tablets, and smartphones, where the combination of small file size and high definition brings a wonderful viewing experience.
However, when it comes to non‑linear video editing (NLE) software like Final Cut Pro, Adobe Premiere Pro, or DaVinci Resolve, HEVC/H.265 presents serious challenges. Editing requires the video to be decompressed frame by frame, and HEVC’s complex compression algorithm demands much more processing power than older codecs. Even on a powerful Mac, scrubbing through HEVC footage can be choppy, and applying effects or color grading often leads to dropped frames and long rendering times. This is why professional editors almost always transcode HEVC/H.265 into an intermediate codec like ProRes before starting their projects.
The Real‑World Problem: Importing HEVC/H.265 into Final Cut Pro
Let me share a typical scenario that many Final Cut Pro users have experienced. I received the following message from a reader:
*“I have to convert one of my HEVC/H.265 movies into a compatible format for Final Cut Pro on Mac. I need to use some content of the HEVC/H.265 in Final Cut Pro. Can you tell me which software can help me to convert HEVC/H.265 to Final Cut Pro? What is the best format for Final Cut Pro editing? Any suggestion will be appreciated.”*
This message perfectly captures the confusion and frustration. When you try to directly import an HEVC/H.265 file (usually with the .mp4, .mkv, or .mov extension) into Final Cut Pro, you might succeed in adding it to the media pool, but the editing experience will be painful. Playback stutters, the timeline becomes unresponsive, and exporting takes ages. In some cases, older versions of Final Cut Pro may reject the file entirely, showing an error like “File format not supported.”
The root cause is simple: Final Cut Pro is optimized for its native codec family – Apple ProRes. While newer versions of Final Cut Pro (especially on Apple Silicon Macs) can decode HEVC/H.265 in real‑time for simple cuts, any serious editing – transitions, filters, color correction, keyframing – will force the software to render previews constantly. This destroys your creative flow.
Why ProRes Is the Best Format for Final Cut Pro Editing
Apple ProRes is an intermediate codec specifically designed for post‑production. It balances image quality, file size, and decoding speed. Unlike HEVC, which is a delivery codec, ProRes stores each frame with very little compression, allowing the editing software to access any frame instantly without heavy CPU/GPU decoding. According to Apple’s Final Cut Pro product page, ProRes is the native editing codec for Final Cut Pro X, 7, and 6. By converting HEVC/H.265 to ProRes MOV, you can edit natively, and you will no longer need to render videos before playback or export.
There are several ProRes variants. The two most relevant for most users are:
- ProRes 422 – Ideal for most HD and 4K editing tasks. It offers excellent quality with a reasonable bitrate (approximately 147 Mbps for 1080p at 60 fps). Use this for general purpose editing, including YouTube videos, corporate projects, and independent films.
- ProRes 4444 – This version preserves even more color information (4:4:4 chroma subsampling) and includes an alpha channel for transparency. It is intended for high‑end visual effects, green screen compositing, and mastering. The bitrate is much higher (up to 500+ Mbps for 1080p), so only use it when you truly need maximum quality.
For most users converting HEVC/H.265 movies, ProRes 422 or ProRes 422 HQ will be more than sufficient.
Why You Need a Dedicated HEVC/H.265 to ProRes Converter
You might be wondering: can’t I just use Final Cut Pro’s built‑in “Create Optimized Media” feature? The answer is yes, but it has limitations. Final Cut Pro can transcode imported HEVC files to ProRes Proxy or ProRes 422, but the process is slow and ties up your editing system. Moreover, if your original HEVC file is stored in a container that Final Cut Pro does not fully support (like MKV or certain MP4 variants), the import may fail. A dedicated converter gives you more control, batch processing, and often faster performance thanks to hardware acceleration.
The converter I recommend in this guide is a professional tool that works on both Mac and Windows. It is designed specifically to transcode HEVC/H.265 to Apple ProRes 422/4444 MOV format without quality loss. Below, I will walk you through the entire process step by step.
Step‑by‑Step Guide to Convert HEVC/H.265 to Apple ProRes
Step 1: Download and Install the Converter
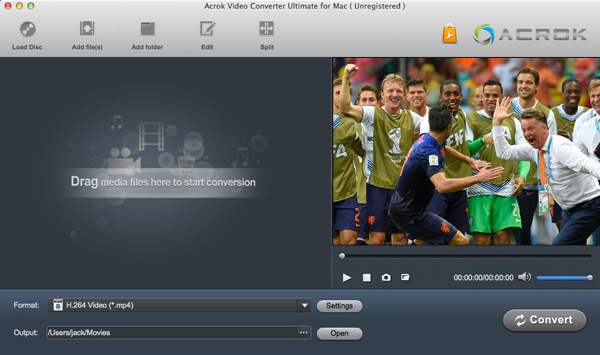
First, download the appropriate version of the HEVC/H.265 to Apple ProRes converter from our website – either for macOS or Windows. The installation is straightforward: double‑click the installer and follow the on‑screen instructions. Once installed, launch the application. You will see a clean, intuitive main interface. Even if you have never used a video conversion tool before, you will find it easy to navigate.
Step 2: Import Your HEVC/H.265 Movies
After launching the software, click the Load Disc button (or “Add File” / “Import”) to add your HEVC/H.265 movies. You can select a single file or multiple files for batch conversion. The software supports all common HEVC/H.265 containers, including .mp4, .mkv, .mov, and .mts. Once imported, the files will appear in the media list, showing their original codec, resolution, duration, and file size.
Step 3: Choose Apple ProRes as the Output Format
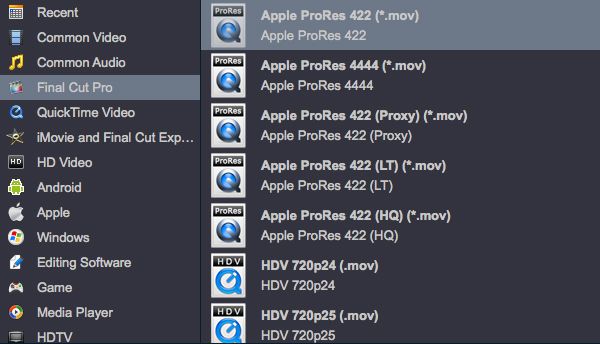
Now click on the Format column for any file (or use the “Profile” dropdown). A format selection window will open. Navigate to the Apple ProRes category. You will see several options:
- Apple ProRes 422 Proxy – low quality, for offline editing on slow computers
- Apple ProRes 422 LT – lower bitrate than standard ProRes 422
- Apple ProRes 422 – best for most editing work
- Apple ProRes 422 HQ – higher bitrate, recommended for 4K and visual effects
- Apple ProRes 4444 – with alpha channel, for high‑end VFX
- Apple ProRes 4444 XQ – extremely high quality for mastering
Choose the one that matches your editing needs. For most HEVC/H.265 movies, Apple ProRes 422 or 422 HQ is ideal. The output container will automatically be MOV.
Step 4: Adjust Output Settings (Optional)
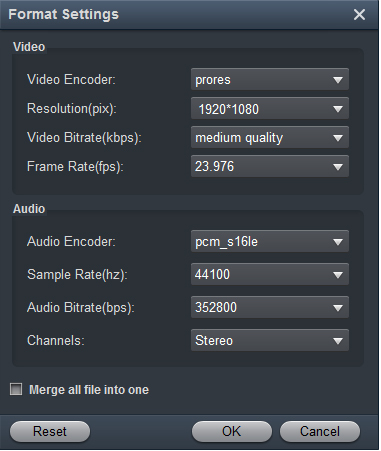
If you need fine control, click the Settings button next to the format selection. A dialog box will appear where you can adjust:
- Resolution – keep the original resolution, or scale down (e.g., from 4K to 1080p) to save disk space.
- Frame rate – match the original or convert to a standard like 23.976, 25, 30, 50, or 60 fps.
- Bitrate – for ProRes, bitrate is determined by the variant you selected; however, some converters allow you to override it (not recommended unless you know what you are doing).
- Audio settings – choose codec (AAC, PCM, etc.), sample rate, and channel configuration. For ProRes workflows, PCM (uncompressed) audio is best.
I recommend leaving the default settings unless you have a specific requirement. The converter is optimized to preserve the original quality while producing a smooth‑editing ProRes file.
Step 5: Start the Conversion
Once everything is set, click the big Convert button. The software will begin transcoding your HEVC/H.265 movies to Apple ProRes MOV. Depending on your computer’s hardware (CPU, GPU, RAM) and the length/resolution of the video, this may take anywhere from a few minutes to an hour. The converter uses hardware acceleration (Intel Quick Sync, NVIDIA NVENC, AMD VCE, or Apple Video Toolbox) to speed up the process significantly. You can monitor the progress via a real‑time percentage bar.
When the conversion finishes, you will hear a completion sound (or see a notification). Click the Open button to reveal the output folder containing your ProRes MOV files. These files are now ready to be imported into Final Cut Pro X, 7, or 6 for seamless, render‑free editing.
Additional Tips for a Smooth Editing Workflow
- Disk space management: ProRes files are much larger than HEVC originals. A one‑hour 1080p HEVC movie (about 2 GB) may become 50‑80 GB as ProRes 422. Make sure you have a fast external SSD or ample internal storage before converting.
- Use proxies for 4K/8K: If your computer struggles with even ProRes 422, consider converting to ProRes 422 Proxy first, edit, then relink to higher‑quality ProRes for final export.
- Batch conversion: If you have a whole folder of HEVC movies, use the batch feature to convert them overnight.
- Keep the original HEVC files: After editing and exporting your final project, you can delete the ProRes files to free up space, but keep the original HEVC files as an archive.
What Is HEVC/H.265? (Brief Technical Background)
For those who are curious, High Efficiency Video Coding (HEVC) is a video compression standard that succeeds H.264/MPEG‑4 AVC. It was jointly developed by the ISO/IEC Moving Picture Experts Group (MPEG) and ITU‑T Video Coding Experts Group (VCEG). The official specifications are ISO/IEC 23008‑2 MPEG‑H Part 2 and ITU‑T H.265. HEVC introduces larger coding tree units (up to 64×64 pixels), improved motion compensation, and more sophisticated intra‑frame prediction, enabling roughly 50% better compression than H.264 at the same quality. That is why 4K Blu‑ray and most streaming services now use HEVC.
Conclusion
Converting HEVC/H.265 to ProRes 422/4444 MOV is the most reliable way to edit high‑definition movies in Final Cut Pro without rendering delays or performance issues. While online converters or free tools might promise quick solutions, they often lack proper ProRes encoding or introduce quality loss. The dedicated converter I have introduced in this step‑by‑step guide gives you full control, fast hardware‑accelerated transcoding, and professional results. Download the free trial today, test it with one of your HEVC movies, and experience the difference of editing with ProRes. If you have any questions or run into issues, feel free to leave a comment below – I am happy to help. Happy editing!


Leave a Reply